Table of Contents
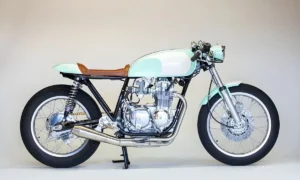
ToggleOwning a BMW R100 is a thrill for any motorcycle lover. This classic bike has a unique charm, and giving it a fresh paint job can make it look even more stunning. Not only does new paint enhance its appearance, but it also protects the bike from the elements, ensuring it stays in top condition for years.
In this guide, I’ll walk you through the entire process of painting your BMW R100. We’ll cover everything from the initial prep work to the final clear coat. Whether you want to restore your bike to its original glory or give it a custom look, you’ll find all the tips and tricks you need right here. Let’s get started and transform your BMW R100 into the masterpiece it deserves to be!
Preparing for the Paint Job
Alright, the first step in our BMW R100 paint job adventure is preparation. This stage is crucial because good prep work sets the foundation for a flawless finish. Let’s break it down.
Research and Inspiration
Before you even pick up a paint brush or spray gun, spend some time gathering inspiration. Browse through websites, forums, and social media platforms dedicated to vintage motorcycles. Pinterest and Instagram are gold mines for finding stunning color schemes and custom designs. Personally, I love scrolling through motorcycle hashtags on Instagram – the creativity out there is incredible!
Once you have a few ideas, decide on the color scheme and design you want. Are you going for a classic look with original colors, or are you ready to make a bold statement with something custom? The choice is yours!
Tools and Materials Needed
Now, let’s talk about the tools and materials you’ll need. Trust me, having the right gear makes a world of difference.
- Spray Guns: These are essential for an even paint application. I recommend investing in a good-quality spray gun.
- Sandpaper: You’ll need various grits, from coarse to fine, for different stages of the prep work.
- Masking Tape: Essential for protecting areas you don’t want to paint.
- Primers and Paints: High-quality automotive primers and paints are a must. Look for urethane or acrylic options for durability.
- Safety Gear: Don’t forget respirator masks, gloves, and goggles. Safety first!
- Workspace Setup: Make sure you have a well-ventilated, dust-free area to work in. A clean workspace is crucial for a clean paint job.
Having all these tools and materials ready will ensure a smooth painting process and professional results.
Disassembly and Surface Preparation
With your inspiration and materials ready, it’s time to dive into the hands-on part. The first major task is disassembling your BMW R100 and preparing the surfaces for painting.
Removing Parts
This step might seem daunting, but it’s essential for a thorough BMW R100 paint job. Start by carefully removing the parts you plan to paint, such as the tank, fenders, and side panels. Take your time and be methodical. Label and store each component systematically to avoid confusion during reassembly. Trust me, this will save you a lot of headaches later on.
Cleaning and Sanding
Once you’ve disassembled the bike, it’s time to clean and sand the surfaces. This step is crucial because it ensures that the new paint adheres properly and looks smooth.
First, clean all the parts thoroughly to remove dirt, grease, and old paint. A good degreaser works wonders here. Rinse everything well and let it dry completely.
Next, it’s time to sand. Start with a coarse grit sandpaper to remove any old paint and rust. Be patient and thorough – this isn’t a step you want to rush. After the initial sanding, switch to a finer grit sandpaper to smooth out the surfaces. If there are any dents or imperfections, use a suitable filler to even them out. Sand these areas again once the filler is dry.
Proper surface preparation is key to achieving a flawless BMW R100 paint job. Taking the time to clean and sand thoroughly will make a significant difference in the final outcome.
Priming the Surfaces
With the prep work done, we’re ready to move on to priming. This is another crucial step that shouldn’t be skipped.
Choosing the Right Primer
Selecting the right primer is essential for a durable and attractive paint job. High-build primers are recommended because they fill in minor imperfections and provide a smooth base for the paint. Look for primers specifically designed for metal surfaces, as they offer better adhesion and protection.
Application Techniques
Applying primer might seem straightforward, but there are a few tips to keep in mind for the best results. First, ensure your workspace is well-ventilated. Use your spray gun to apply the primer, holding it at the recommended distance from the surface. Apply multiple thin coats rather than one thick coat to avoid runs and sags. This also helps the primer dry more evenly.
Allow each coat to dry thoroughly before applying the next one. Follow the manufacturer’s drying times – patience here pays off. Once the primer is dry, sand it lightly with fine-grit sandpaper to smooth out any imperfections. Wipe the surface with a tack cloth to remove any dust from sanding.
Proper priming is crucial for the longevity and finish of your BMW R100 custom paint job. It not only helps the paint adhere better but also enhances the overall appearance by providing a smooth and uniform base.
Painting the BMW R100
Now for the fun part – painting! This is where your BMW R100 paint job starts to come to life.
Color Selection and Mixing
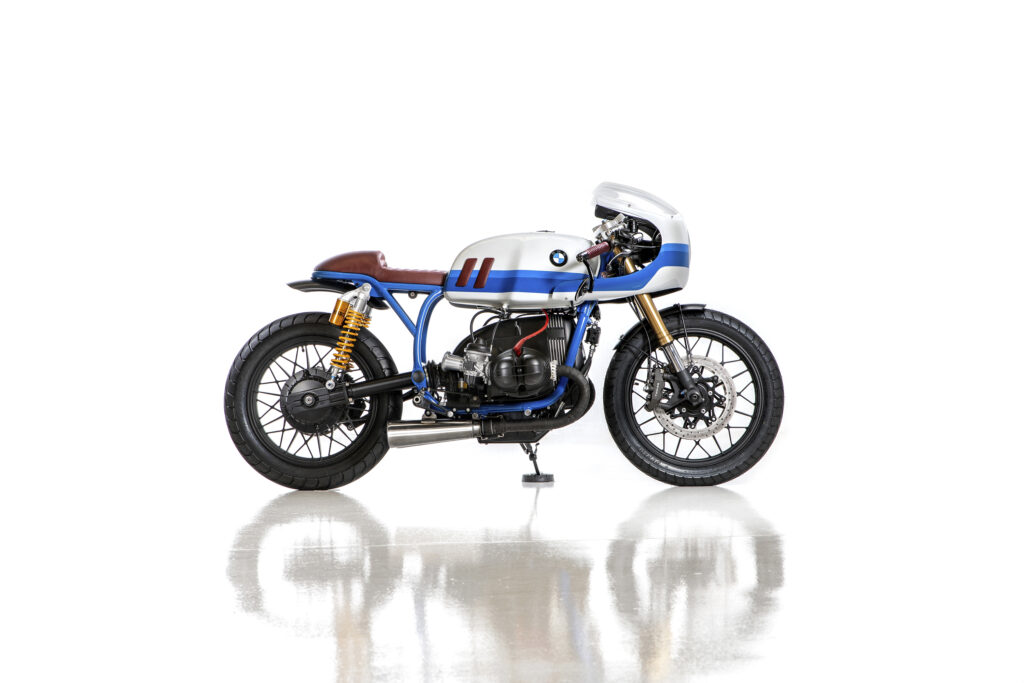
Choosing the right color and finish is a crucial part of the process. Think about what you want your bike to look like. Are you restoring it to its original colors, or are you going for a custom look? Gloss, matte, and metallic finishes each offer unique looks, so choose what suits your style.
Once you’ve decided, mix the paint thoroughly to ensure consistency. If you’re using multiple colors or custom designs, plan out the order and technique for applying each one.
Painting Techniques
For the best results, use a spray gun. Start by applying a base coat. Hold the spray gun at the recommended distance and use long, even strokes. Keep the spray gun moving to avoid drips and ensure a smooth finish. Apply multiple thin layers, allowing each coat to dry before applying the next.
Building up the color gradually helps achieve a deep, rich finish. After the base coat is complete, you may add additional coats to enhance the color and coverage. Between coats, inspect the surface for any imperfections and sand lightly if needed.
Proper painting techniques are essential for a professional-looking BMW R100 paint job. Patience and attention to detail during this step will significantly impact the final result, giving your bike a stunning new appearance.
Adding Custom Designs and Details
Adding custom designs can really make your BMW R100 custom paint job stand out. Whether you’re using stencils or freehand painting, this step allows you to add a personal touch.
Stencils and Masking
Stencils are a great way to add intricate designs without needing a steady hand. Create or purchase stencils for the designs you want to add. Apply masking tape to protect areas that you don’t want to paint. Make sure the stencils are securely in place to prevent paint from bleeding underneath.
Freehand Painting
For more intricate or unique designs, freehand painting might be the best option. Use fine detail brushes or an airbrush to add your custom elements. This technique allows for greater creativity and personalization. If you’re new to freehand painting, practice on a spare piece of metal before working on the bike to perfect your technique.
Adding custom designs can elevate the look of your BMW R100 paint job, making it a one-of-a-kind masterpiece. Whether you’re using stencils or freehand painting, take your time to achieve the best results.
Applying the Clear Coat
After you’ve finished painting, the next step is applying the clear coat. This final layer is crucial for protecting your paint job and giving it a professional finish.
Importance of Clear Coat
A clear coat is essential because it protects your BMW R100 paint job from UV rays, scratches, and other environmental damage. It also adds a glossy finish that makes the colors pop.
Application Process
Apply the clear coat using a spray gun, just like the base coat. Use even strokes and apply multiple thin layers. Allow each layer to dry according to the manufacturer’s instructions. After the final coat, let the clear coat cure completely.
Once the clear coat is cured, polish and buff it to achieve a high-gloss finish. This step not only enhances the appearance but also smooths out any imperfections, giving your BMW R100 a professional, showroom-quality look.
Applying a clear coat is the final step in achieving a durable and beautiful BMW R100 custom paint. It provides the finishing touch that makes your bike stand out.
Reassembly
With the painting and clear coating complete, it’s time to put everything back together. This step requires patience and attention to detail.
Reinstalling Painted Parts
Once the paint and clear coat are fully cured, carefully reinstall each part. Take your time to avoid scratching the new paint. Make sure everything is aligned correctly and securely fastened.
Final Touches
Inspect the bike for any areas that might need touch-ups. Use the leftover paint to fix any small imperfections. Replace any worn-out parts during reassembly to complete the restoration. Your BMW R100 paint job is now ready to be showcased.
Proper reassembly ensures that your BMW R100 looks and functions perfectly. The effort you put into careful reassembly will preserve the quality of your paint job and the overall integrity of the bike.
Maintenance and Care
Your BMW R100 paint job looks fantastic, but keeping it that way requires regular maintenance and care.
Protecting the Paint Job
To keep your paint job looking new, clean and wax your bike regularly. Use products designed for automotive finishes and avoid harsh chemicals that can damage the paint. When you’re not riding, store your bike in a garage or use a cover to protect it from the elements.
Touch-Up Tips
Keep some leftover paint for touch-ups. For small chips or scratches, use a fine brush to carefully apply the paint. Regular maintenance will help preserve the beauty and durability of your custom paint job.
Proper maintenance and care will ensure your BMW R100 paint job stays vibrant and protected for years to come.
Conclusion
Completing a BMW R100 paint job is a rewarding project that transforms your vintage motorcycle into a stunning masterpiece. With careful preparation, the right tools, and attention to detail, you can achieve professional results. This guide provides all the steps and tips needed to carry out a successful paint job, from disassembly and priming to painting and maintenance. Take on the challenge and enjoy the satisfaction of riding a beautifully painted BMW R100. Share your experiences and finished projects with the community, and inspire others to embark on their own restoration journeys.
Read Our Blog about [How to Build a BMW R100 Cafe Racer]
FAQ
How long does a BMW R100 paint job take?
The time required for a BMW R100 paint job can vary, but it typically takes 1-2 weeks for a complete job, including disassembly, preparation, painting, and curing times.
What kind of paint should I use for my BMW R100?
It’s best to use high-quality automotive paints designed for motorcycles. Urethane and acrylic paints are popular choices due to their durability and finish.
Can I do a BMW R100 paint job at home?
Yes, with the right tools, materials, and preparation, you can do a BMW R100 paint job at home. However, professional results may require more experience and a controlled environment.
How do I protect the new paint job on my BMW R100?
Regular cleaning, waxing, and avoiding harsh chemicals will help protect your paint job. Store your bike in a garage or use a cover to protect it from the elements.
Can I paint my BMW R100 myself, or should I hire a professional?
You can absolutely paint your BMW R100 yourself! This guide provides a step-by-step approach that’s achievable for DIY enthusiasts. However, if you’re unsure of your skills or want a highly specialized finish, hiring a professional painter is a valid option.